 This wikiHow teaches you how to insert a simple table into a Microsoft Word document. Open Microsoft Word. Its icon resembles a blue background with a white "W" on top. If you'd rather edit an existing document, simply double-click the document in question. Click Blank document. It's in the top-left corner of the templates page.
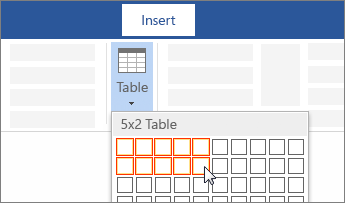 For a basic table, click Insert > Table and move the cursor over the grid until you highlight the number of columns and rows you want. For a larger table, or to customize a table, select Insert > Table > Insert Table. If you already have text separated by tabs, you can quickly convert it to a table.
 Adding a table In Microsoft Word, place the mouse cursor where you want to add the new, blank table. Click the Insert tab in the Ribbon. Click the Table button and select how many cells, rows, and columns you want the table to display. You can also click Insert Table and enter the number of columns and rows for the inserted table.